Community Spotlight: Scourge Alters

Ted Rodney • October 6, 2018
Humble Beginnings
Art is what drew me to the game of Magic when I was very young. Before I ever learned the rules of play, I was fascinated by the ways in which each card was depicted. I would spend hours pouring over my small collection of cards, enthralled by the beauty of the art. Eventually, I began to learn the names of the artists and I could recognize an artist by their style. I would challenge myself to try to determine who the artist for a card was without looking at the name tag at the bottom.
Growing up, I was a hobby artist; always doodling in a sketchbook or painting a canvas in my free time. I never thought that I would end up in a position to actually do art for a living. In fact, if it were not for the niche of altering Magic cards, I don’t think that I would have ever stepped into the role of a professional artist.
In 2013 a friend of mine showed me some cards that had been altered with extensions of the original art and I thought that they were amazing. I always felt like the art was too small on the cards and seeing the extended art was impressive. I decided that I wanted to try to make something similar for myself. My first attempts were quite a learning process. I ruined my cards by applying thick layers of paint that had too much texture. My colors did not match the colors on the cards and overall, I was not satisfied with the results.

I started to read tutorials that other artists had published about their techniques for altering cards and in time, I was able to get my colors to match I also managed to smooth out the texture of my paints so that the cards did not have any more lumps or bumps. I started to trade my altered cards to local players and in 2014 I eventually built up the courage to join the Altered Art community on Facebook to start sharing my work more publicly.
At this time, I think that the Facebook group had under 10,000 members and I had no exposure outside of my local play-groups. I took in some commission work through clients on Facebook and continued doing work for local players. It was fun to have projects to work on during my evenings and weekends and it was exciting to get paid a little bit of money to do something that I really loved.
Taylor Swiftspear
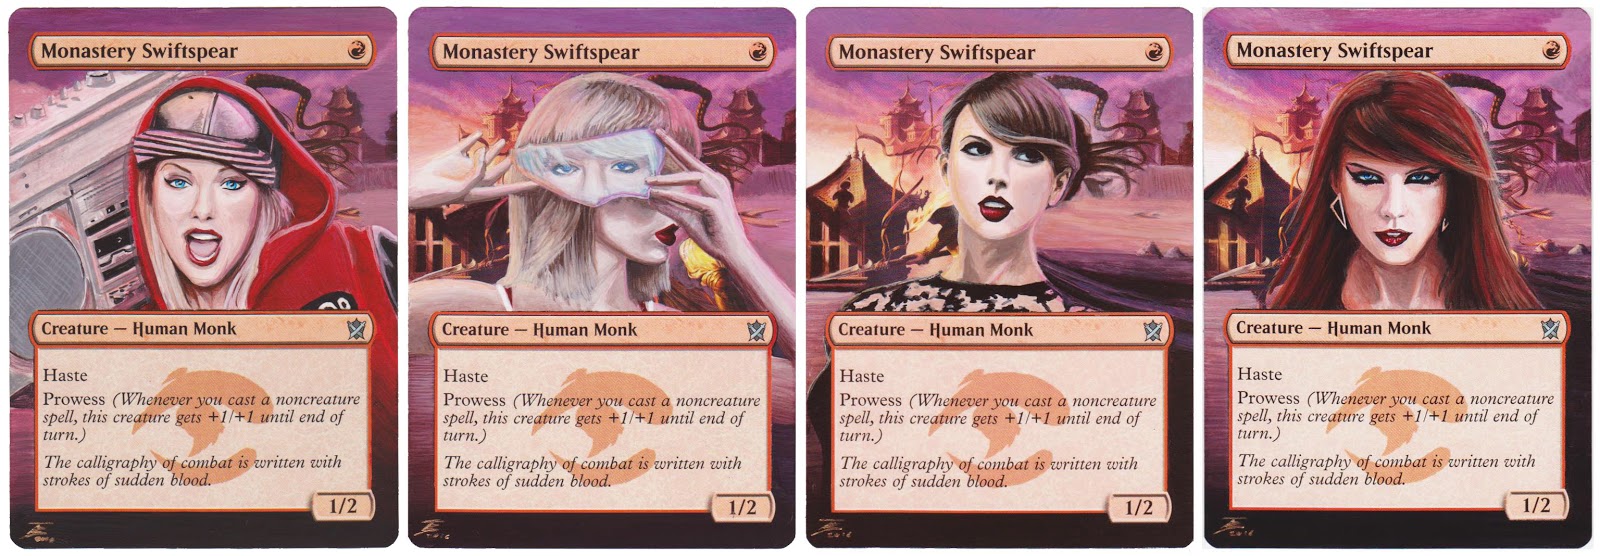
Three years ago, I got a commission request for a set of Monastery Swiftspear to be altered to have portraits of Taylor Swift on them. I thought that the request was hilarious and I gladly accepted it. I decided to post pictures of this playset on the MagicTCG subreddit. I thought that for sure the post would be downvoted into oblivion and that people were going to ridicule me for the work and at the same time, I thought that the commission was enough of a joke that I did not care if other people thought that it was stupid or worthless.

To my surprise, people absolutely loved it. My inbox was flooded with fun comments and commission requests. After several days of responding to potential clients, I had so many projects added to my queue that I felt a bit overwhelmed. At this point, I realized two things: first, I was going to have to start raising my prices to keep up with the new demand for work and second, if people continued to be this interested in purchasing my work, I might actually be able to turn my hobby into a part-time or full-time job.

A walkthrough procedural of doing Taylor Swiftspears.
Artistic Process
During the past five years, I have been exploring various art styles and techniques for altering cards. Most of the methods that I use for non-foil cards is very similar to other artists. I often start with a grey base layer to hide the underlying parts of the card that I wish to paint over. Occasionally, I will strip the printed ink off of the card to expose the blank cardstock beneath rather than starting with the grey base.
When working directly from reference images I will use the classic “carbon transfer” technique. This involves printing a out the reference image to scale, applying graphite to the back of the print, laying the print over the card, and then, tracing the art on the print. This leaves a graphite outline of the sketch on your card which works as a great starting point for painting.

I am most well known for my work with foils. When I started to work on foil cards, I was one of the only artists in the community who would de-ink the portions of the card using acetone and then paint with very thin, transparent layers so that the foil would actually shine through the paint in the finished alter. I have pioneered several techniques for altering foil cards and I have published tutorials so that other artists can try to achieve the same effects in their own projects.
For all of my work with foil cards, I seal the alter with an acrylic varnish. I generally use a Satin varnish from Krylon unless the client has a specific request for matte or gloss.
All of my work is priced based on an estimate of how long the commission will take. Some things only take a few minutes and are very cheap while other projects can take days to complete and may cost hundreds of dollars.
My foil alteration process.
My de-inking process.
As of this year, altering cards is my full time job and I generally have a month-long backlog of work at any given time.
My facebook page is www.facebook.com/scourgealters
Cardsphere is Scourge Alters

