Tagging Insight - Building a Deck

Matt Bodensteiner • March 26, 2020

Tags are probably the most open-ended feature on Cardsphere. Tags were first introduced back in June 2018 (check out this article for the basics) and have since served as the foundation for managing your cards on Cardsphere. Anywhere from keeping track of decklists and buylists to which box or binder a card is kept in, tags can serve a vast array of use cases. However, being so open-ended also means these use cases can seem abstract or difficult to grasp.
This article is the first in a series (of how many is to be determined) where I will aim to provide answers to questions like, "What are tags for?" and "How do I use tags?". I'll also dive into some of the use cases to demonstrate how tags can be used to improve your Cardsphere experience.
To start things off, let's look at how to take a sample decklist and use tags to estimate how much it would cost to build that deck through Cardsphere.
Import the Deck
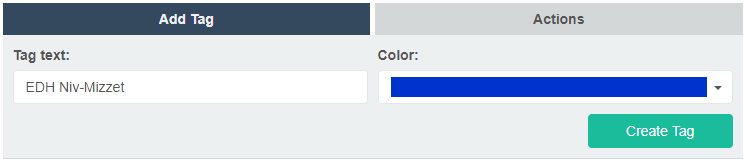
Before we get to the import, navigate to the Tag Manager screen and create a new tag for the deck. For this guide, I will be creating a tag for an EDH deck that I've been brewing around Niv-Mizzet, Parun as an example.
Of course, the next thing we need is a decklist. This can be an export from Scryfall, Deckbox, or whatever deckbuilding tool you use, or even just a list in Notepad. The main thing is having the card names and quantities in a format that the Import tool recognizes. After the import, your account will automatically go on vacation mode, so other details such as condition, language, offers, etc. can be modified later.
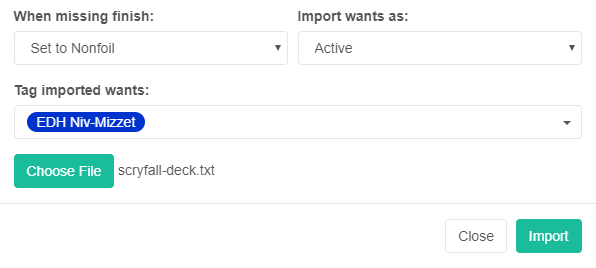
On the Wants screen, click Actions and then Import. In the Import Wants modal, there is a dropdown called Tag imported wants and this is where we want to select the new tag that was added. The other dropdown options can be set as well to save some work later. Once the decklist file is chosen, we can import.
Refresh the Wants page and all those new cards will be added and tagged appropriately. However, all of the offers are set to 100% by default. Good thing our account is set to vacation mode! This is where tags start to become really handy.
Adjust the Offers
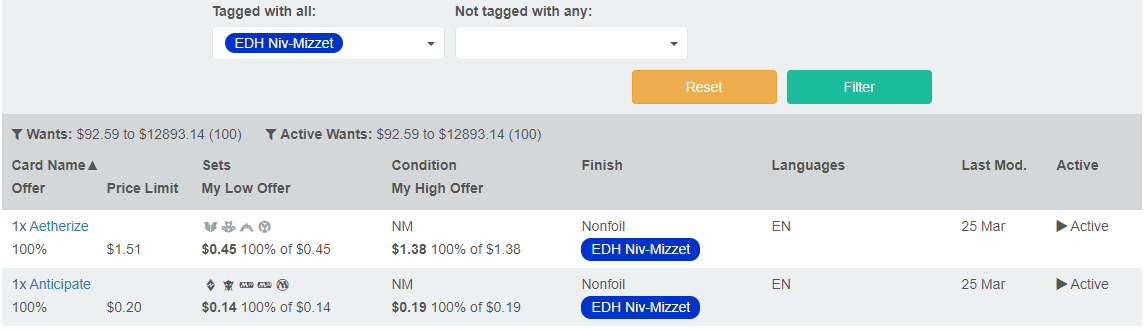
Still on the Wants page, click over to the Filter tab. Under the Tagged with all dropdown, let's select the new deck tag and click Filter. This narrows our Wants list down to only the items with our new tag.
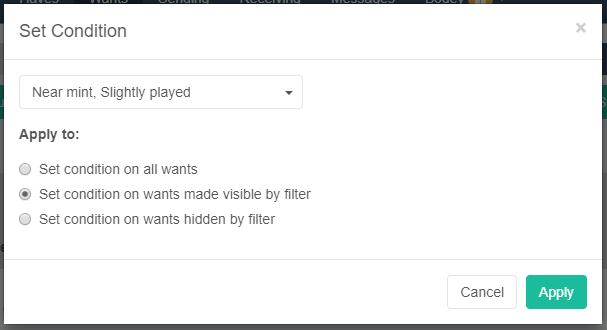
From this point, we can use the options under the Actions tab to help set the acceptable conditions, languages, offers, and price limits in bulk. I am going to set all offers to 80% and accept Near Mint, Slightly Played, and only English cards. When applying the actions in bulk, we can see a radio button in the pop-up modal to apply the action on only the wants made visible by filter (i.e. our tagged items).
Once we have updated all the tagged Wants with new offer percentages and other acceptable conditions, we can go through and do some more fine tuning as needed. In this case, I decided to modify the specific printings to tighten up the price ranges (I'll pass on Alpha Counterspell, thanks). When all is said and done, our list of wants for the new deck looks more like this:
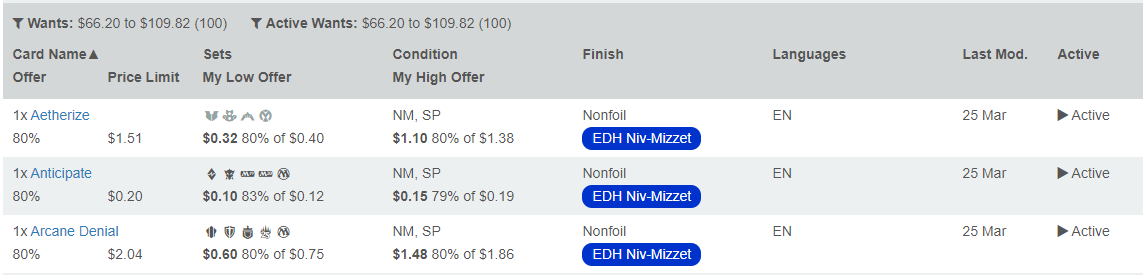
Much better! Once I turn my account off vacation mode, I can watch the cards roll in.
Being able to tag a card for a specific deck and then apply filters and actions based on that tag enables more fluid control over things such as budget (keeping those tagged wants within a total dollar amount) and acceptable condition/languages (to cast the net wider and increase likelihood sellers are able to make a package). Next, we will look at some of the ways maintaining the deck becomes easier with tags once the cards have arrived.
Maintaining the List
Granted, not everyone likes having their entire collection or decked cards as part of Haves. I get that. Cardsphere might be just for the cards you want to sell or trade. If that's the case, the rest of this section may not be applicable to you. Though I encourage you to read on just in case this tagging workflow sparks a new idea.
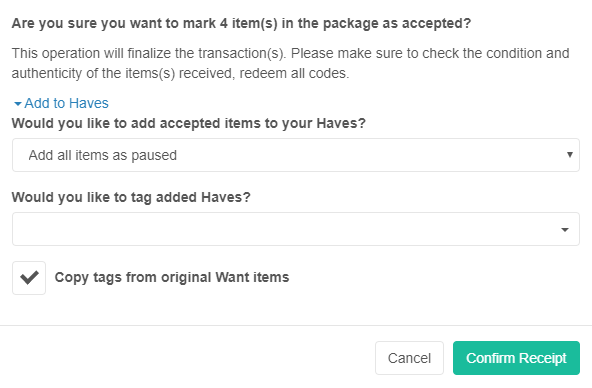
As cards arrive and are able to be marked received, there are a couple important options in the Confirm Receipt modal. We want to add the received cards to our Haves list with the same tag as it had on our Wants list. This will allow us to do similar filtering and mass actions by our tag later.
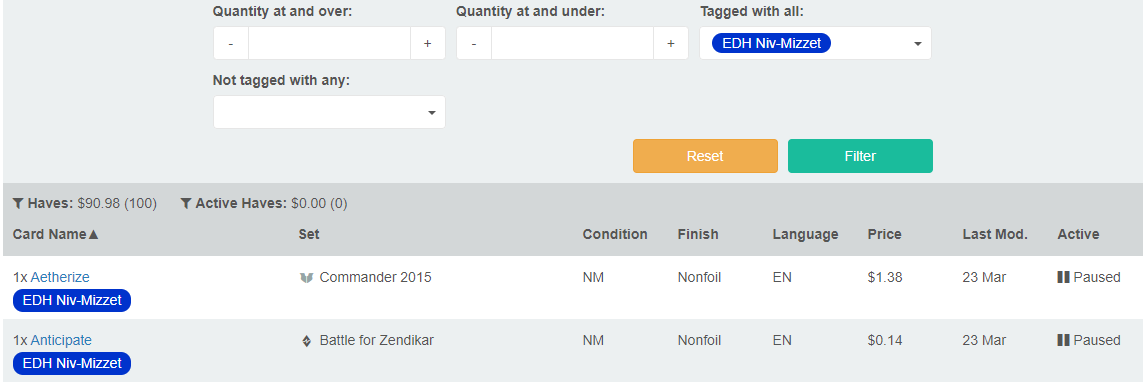
To browse the decklist from Haves, we could go to the Filter tab and select the tag under Tagged with all just like on the Wants page, but there is a bit of a shortcut on the Tag Manager screen. In our list of tags, you'll notice there is a quantity of tagged Haves and a quantity of tagged Wants to the right of the tag text. Both of these are links and clicking one of them will take us to the corresponding Haves or Wants page with the filtering already applied!

Once we have the filtered list of Haves, we can easily see the cards that are currently tagged as being in our deck and that provides us with a surprising amount of information. For instance, we can see exactly how much our deck is valued at per the Cardsphere index. This is a good metric to have if we ever want to sell the deck down the road, or maybe we need to swap some cards to stay within a budget deckbuilding constraint. Seeing exactly which cards from our collection are part of this deck might also encourage us to upgrading specific printings, foils, conditions, or foreign languages.
When I plan changes to one of my decks and am adding new cards to my Wants, I always make sure and tag them with the deck they are intended for. Then, once I receive that new card in the mail and confirm receipt, I can quickly and easily filter my Haves by that tag and de-tag the card that is being swapped out (and maybe even set its status to Active if it's not going under my "EDH zExtras" tag).
Tagging Out
While using tags to build a deck on Cardsphere is not going to provide you with card type breakdowns, color distribution and curve charts, or opening hand simulators, it does enable you to be more fluid in maintaining your offers to buy the cards for that specific deck, and further tracking the cards as part of a larger collection becomes nearly effortless.
Thank you for hanging in there and making it to the end of my first article. If there are specific use cases for tags that you'd like to see me cover as a part of this series, please let me know on reddit or Discord!

