Making the Shockbox: Mark 1

Meghan Burden • September 9, 2021
Sheepwave here. You might know me as a proxy artist. Or you might know me as a frequent guest on various Commander streams. Or maybe you first heard of me when the Shockbox thing started. But before I became a full-time content creator, I used to teach kids how to build and program robots. When I had the idea to build a machine that turns ingame life loss into electrical shocks, I already had almost everything needed to make it happen on hand. Since I started this project, a lot of people have wanted to know how to build their own, or just been curious to hear the story of how it came to be.
Now, this is a tricky subject. On the one hand, I would love to encourage people to experiment with the joy of electronics. On the other hand, I don’t want to feel responsible if someone tries to imitate me and hurts themselves. It's very funny when Goblin Electromancer plays with electricity, and a lot less funny when it happens in the real world. Enough power to turn on a small lightbulb is enough to be lethal if applied wrong. Even “safe” current can be deadly to those with heart conditions.
If you are going to try this, you should know exactly what you are doing, not just follow directions of some madwoman online. If you want to try to do what I did, you should already have an understanding of electronics and some basic coding. So I'm going to be explaining how I made the Shockbox, but cautiously.
Let’s Get Started: Shockbox Mark 1
The Shockbox as it exists now(which I call Mark 2) is stuffed full of lights, speakers, sensors, safety mechanisms, backup systems, and other extraneous features. These features enhance the experience, but are not required parts of the core functionality. While I will be covering all those in a second article, I have to start with the bare minimum needed to make the device work: The original Shockbox Mark 1.

What is TENS?
The Shockbox is an interface between the game state of magic and TENS electrode pads attached to each player’s arm. TENS stands for Transcutaneous Electrical Nerve Stimulation. This means using a pair of conductive gel pads to create electrical contact with the human body, then running a current between them. I personally use one to help with back pain, and the technique has a lot of very legitimate therapeutic applications... None of which involve using the shocks deliberately to cause pain, for the record. (Though, nobody has ever done research into if Magic the Gathering is effective as a muscle relaxant. Exercise for the reader.)

The part about TENS units we care about is that they are a relatively safe way to shock people when used correctly. They output an alternating current through jacks that are connected to the electrode pads. Conveniently, most of them actually use standard audio jack sizes (mine uses the slightly smaller than standard ones that are rare now but used to be used on phones) meaning we can easily hijack the signal as easily as a precon player getting Mindslaver locked by the guy nobody likes at your LGS.
Controlling the Signal
This is a relay board. Because the Shockbox wants to send the same electrical signal four different places, a four-channel relay board ended up being exactly right for the job.
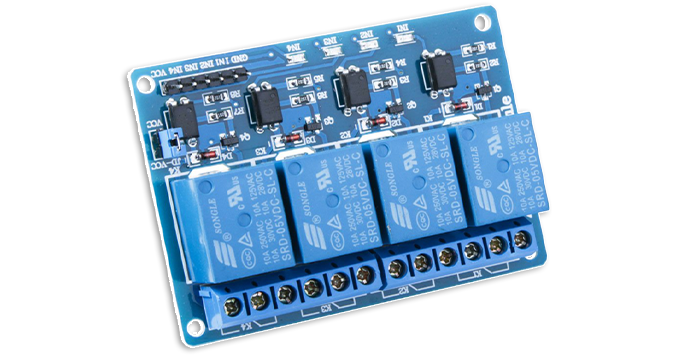
A relay is a switch that is controlled by an electrical signal. When a current is applied to the relay, it connects terminals A and B together. The two electrical systems do not touch each other, so they can safely be used to allow low and high voltage systems to interface with each other. Because I want to send the same signal out to each player, all four of the A terminals are wired together, but the B terminals all go to a different player’s electrode jack. The final design of the Shockbox actually has two additional relays in it that control other systems, so if I was starting over from scratch, I would use a 6 channel relay board instead of 4.
Microcontroller
Once I knew how I was going to send the TENS current to a specific player, I had to decide what I was going to use as a controller. The internal logic that runs the Shockbox is actually quite a bit more complex than it might first appear, and this is a perfect project to use an Arduino in.
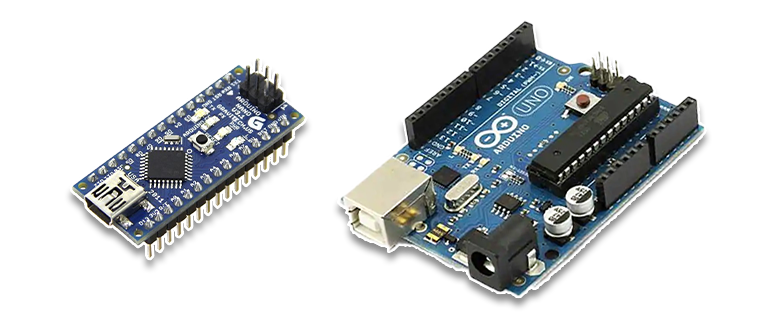
Arduinos are tiny computers that can read and write to electrical input and output pins to interface with sensors, motors, buttons, displays, and whatever else you can think of. Their processor specs are in the same ballpark as the original black and white GameBoy, and while they aren't particularly powerful as computers, it's hard to beat a five-dollar price tag. They are perfect for low and medium complexity automation and robotics, and can be programmed extremely easily. For reasons I will get into in part 2, my Shockbox actually uses two of these devices that work together, plus a third one that controls cameras during live shows, but if you only intend to take it as far as Mark 1, you should only need one.
I/O Hardware
Inputting life total changes into the Shockbox is easiest done with buttons. I like buttons that have a built in light, as I can use them to blink or fade on and off to communicate information about how much shock damage is charged up (more on that later) visually.

I went with buttons meant for arcade machines. Importantly, the lights in this are 5 volts, so that my 5v microcontroller can actually power them. Alternatively, you could just use a smaller button and a separate LED. The wiring would be the same.
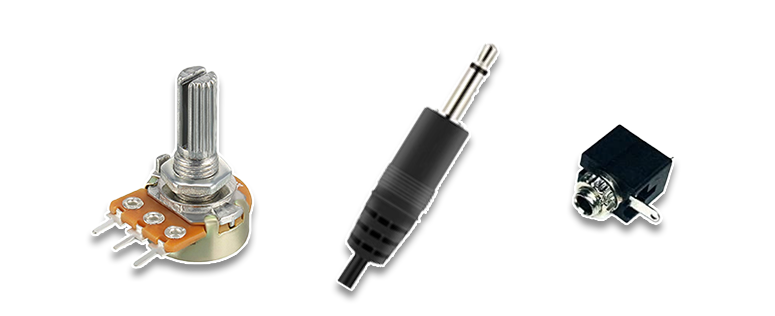
The next step was getting my hands on extra electrode pads and connector cables, some jacks that were the same kind as my TENS unit, and some 10k rotary potentiometers. Potentiometers are resistors that change their resistance based on the position of a rotary knob, and these allow each player to weaken the strength of the shock to suit their personal tolerance. Finally, for audio feedback, I added a simple piezo buzzer to make a small beep whenever a button is pressed.
The Program
TENS units don’t actually hurt much, if you're using them correctly. But our bodies are still not used to the sensation of having current running through them. When it happens suddenly or unexpectedly, the experience is a lot more…. Shocking. For this reason, the device does not simply deliver a shock immediately once you have put in how many points of damage you take. That would be too nice.
Instead, there are a whole bunch of algorithms designed to heighten stress and suspense. Those algorithms change what random values the “THRESHOLD” variables are, and how long the delay is before it triggers. Sure, it may be bad to press a button and then get zapped, but pressing a button and then waiting to see IF you get zapped is so much worse. I think I might be a sadist.
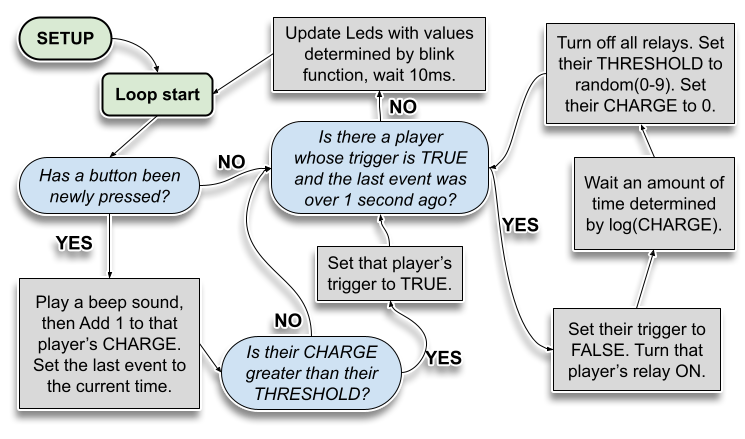
Even though they were already present in the code back when I made the Mark 1, I will be explaining the stress and suspense functions in detail in part 2. While I won’t be releasing source code because every real programmer would have a stroke if they saw how messy it is, the Arduino IDE has tutorials that explain all the fundamentals I used... And liberally copy-pasted from.
If you have never done programming before, and the idea of having a tiny computer that can do all kinds of cool but manageably simple tasks with electronics has piqued your interest, I suggest you check out literally any project but this to get started with. Most Magic players already have the kind of analytical and inquisitive mind that you need to do this sort of thing. You may discover you have a knack for it!
Assembly
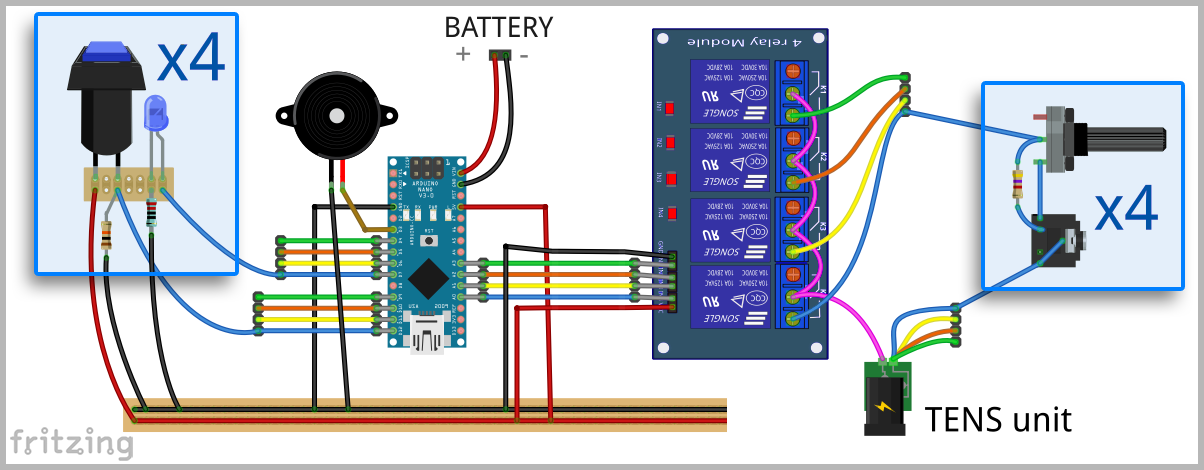
The wiring is pretty simple, as using a microcontroller offloads complexity into the coding side. It includes: A buzzer, four sets of buttons and lights, four connections to corresponding relay control pins, then four outputs that each run through a potentiometer and another resistor in parallel. Note that the pins shown on the Nano in this diagram are not actually the correct mapping, as the LEDs are all connected to PWM pins that let them fade gradually, but this is an optional feature. This diagram is abstract, showing just what connects to what. In the actual box, the parts are soldered to intermediate boards and screw terminals that make it easier to manipulate them and swap parts around.
Once I had everything functional sprawled across my playmat, I figured out how big a container I would need to fit all the components in, by measuring everything and making 3d models of the parts. While this was total overkill for the Mark 1, doing this work made my life a lot easier as I moved to building the Mark 2, which is much more compact. I left space for the speaker system I planned to add later, and grabbed a suitably sized plastic container while I was at the grocery store.
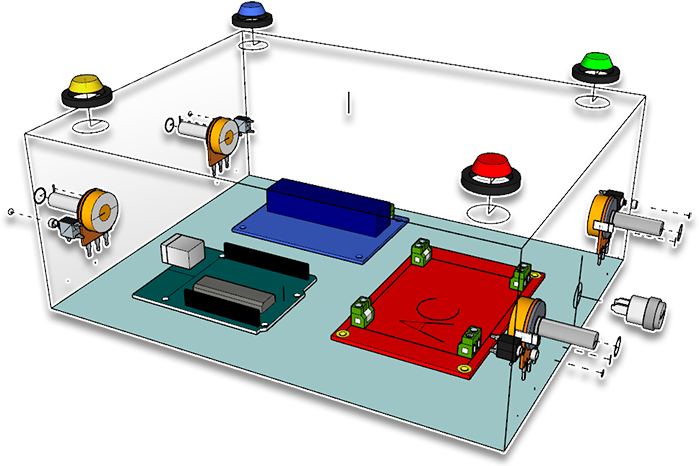
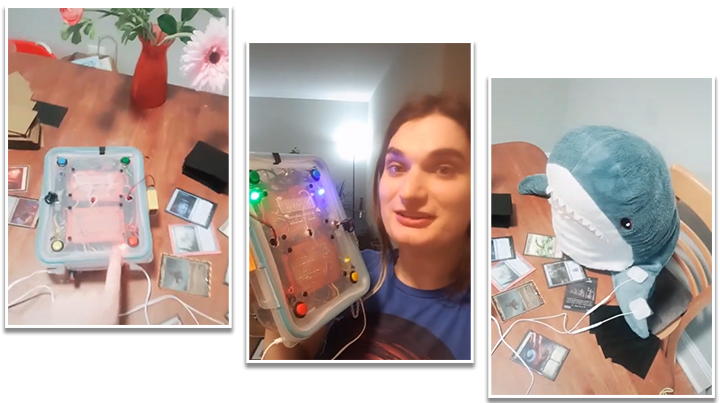
After drilling holes for all the jacks, buttons, support screws, knobs, and a key ignition power switch I added for style, I thought I was pretty much done. I posed some stuffed sharks around it playing a Magic game, and filmed a TikTok, the utter derangement of which fascinated far more people than I expected it would.
The degree of interest people expressed in it, even in such a primitive state, was enough to prove that it would be worth making the Mark 2, so I ordered a plastic junction box and started planning out the next version. More on that next time.
Final Thoughts
Remember that thing I said about how electricity is really, really dangerous to run through a person? This should not be your first ever electronics project. If my having done this inspires you, then I encourage you to chase that inspiration, but starting off with this would be like trying to teach a six year old magic by throwing them into a cEDH game.
If you would rather just watch this madness from a distance, good idea. The first game streamed with it is on YouTube, and if you want to catch the next one live, you should probably follow me on Twitter, which is where I'll be announcing the next live Shockbox game. Everything you’ll need can be found on my website at Sheepwave.com.
Next time on Cardsphere, I'm going to discuss not only the Shockbox Mark 2's new features, but also how it is able to control multiple cameras to create a live game that knows when it should switch to facecams!
~Sheepwave

